SQLite Usage with MVVM Model in Xamarin.Forms
Contents
While developing mobile applications, we sometimes need a database. We need to keep some of the users’ data in one place. SQLite is a small and fast database engine. The SQLite source code is public domain and free for anyone to use for any purpose. That’s why I use it frequently in the applications I develop. In my opinions, SQLite is one of the best useful plugin for Xamarin.
In this post, I will add a local database with SQLite to the Weather application I developed earlier. Later I will show this data in a CollectionView. Also, I will make customizations in the design with the PancakeView plugin. Of course, I used the MVVM model while developing the application.
So, let’s started. Follow the steps below in order.
1) Install the SQLite Plugin
First, you must download the required plugin to add SQLite database to Xamarin.Forms application. You can install the add-on by running the following code in the Package Manager Console.
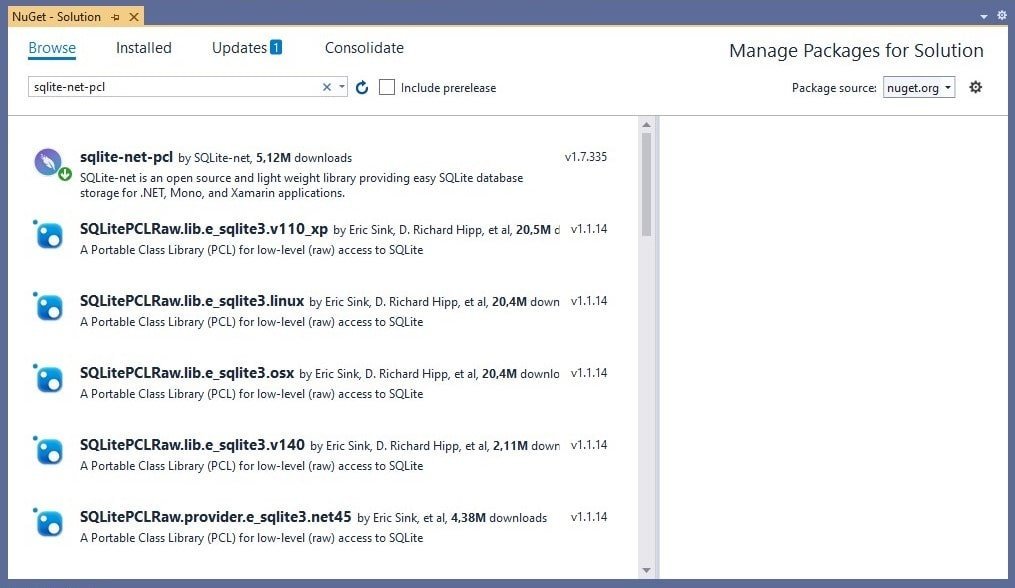
Install-Package sqlite-net-pcl -Version 1.8.0-betaAlternatively, open Manage NuGet Packages for Solution by right-clicking on the application folder. Then type sqlite-net-pcl in the search bar on the Browse tab. Install the plugin from the results you see.
2) Create IDatabase Interface
I developed the Weather application with the MVVM model. So I will add an SQLite on top of the MVVM model.
Add a folder named Datas to the project. In the Datas folder, there will be classes and interfaces where all data will be kept. Then add an interface called IDatabase into this folder.
    public interface IDatabase
    {
        SQLiteConnection GetConnection();
    }
There is a GetConnection() method in the IDatabase interface. We will implement this method in Android native platform to create SQLite connection. In other words, we will use the platform features in Xamarin.Forms with DependecyService.
3) Add SQLite Dependecy Service
Now navigate to your project’s Android folder. Add a folder named Connection here. Then add a class named SQLiteConnection.cs to the Connection folder. This class will implement the IDatabase interface. So we will write the GetConnection method here.
[assembly: Dependency(typeof(Weather.Droid.Connection.SQLiteConnection))]
namespace Weather.Droid.Connection
{
    class SQLiteConnection : IDatabase
    {
        public SQLite.SQLiteConnection GetConnection()
        {
            var filename = "Places.db";
            var documentspath = System.Environment.GetFolderPath(System.Environment.SpecialFolder.Personal);
            var path = Path.Combine(documentspath, filename);
            var connection = new SQLite.SQLiteConnection(path);
            return connection;
        }
    }
}
As you can see, this class is a DependencyService. Since it implements the IDatabase interface, it overrides the methods of this interface. In short, a database named Places.db is added with the GetConnection method.
Don’t forget to report that the class is a Dependecy
[assembly: Dependency(typeof(Weather.Droid.Connection.SQLiteConnection))]4) Add SQLite Model Class
Add a class named Places.cs to the Models folder. The Places class is the model class that contains the information of each place we will add. This class includes Id, CityName, Latitude, Longitude and City Key properties. In other words, every place we add to the database should be suitable for this model.
public class Places
{
    [PrimaryKey, AutoIncrement]
    public int Id { get; set; }
    public string CityName { get; set; }
    public string CityKey { get; set; }
    public double CityLon { get; set; }
    public double CityLat { get; set; }
}
5) Create SQLite Database Class
After adding the model class, we have to perform CRUD operations in SQLite database. Add a class named Database.cs to the Datas folder. This class will first establish a database connection with the GetConnection () method we wrote on the Android platform. It will then create a table named “Places” in the database created by this link.
Then it applies database operations such as Insert, Update, Delete, Get on the Places table.
    public class Database
    {
        static object locker = new object();

        SQLiteConnection _sqlconnection;

        public Database()
        {
            _sqlconnection = DependencyService.Get<IDatabase>().GetConnection();
            _sqlconnection.CreateTable<Places>();
        }
        public int Insert(Places place)
        {
            lock (locker)
            {
                return _sqlconnection.Insert(place);
            }
        }
        public int Update(Places place)
        {
            lock (locker)
            {
                return _sqlconnection.Update(place);
            }
        }
        public int Delete(int id)
        {
            lock (locker)
            {
                return _sqlconnection.Delete<Places>(id);
            }
        }
        public IEnumerable<Places> GetAll()
        {
            lock (locker)
            {
                return (from i in _sqlconnection.Table<Places>() select i).ToList();
            }
        }
        public int FullDelete()
        {
            lock (locker)
            {
                return _sqlconnection.DeleteAll<Places>();
            }
        }
        public Places Get(int id)
        {
            lock (locker)
            {
                return _sqlconnection.Table<Places>().FirstOrDefault(t => t.Id == id);
            }
        }
        public void Dispose()
        {
            _sqlconnection.Dispose();
        }
    }
6) Add ViewModel Classes
While adding SQLite to the project, we need three Viewmodel classes. The first is the BaseViewModel.cs class that reports changes. The second is the PlacesViewModel.cs class of the PlacesPage.xaml page. The third is the AddPlacesViewModel.cs class of the AddPlacesPage.xaml page, where we will add a new location.
BaseViewModel.cs
using System.ComponentModel;
using System.Runtime.CompilerServices;

namespace Weather.ViewModel
{
    public class BaseViewModel : INotifyPropertyChanged
    {
        private bool _isLoading { get; set; }
        public bool IsLoading
        {
            get
            {
                return _isLoading;
            }
            set
            {
                if (value != _isLoading)
                {
                    _isLoading = value;
                    NotifyPropertyChanged();
                }
            }
        }

        public event PropertyChangedEventHandler PropertyChanged;
        protected void NotifyPropertyChanged([CallerMemberName] string propertyName = "")
        {
            PropertyChanged?.Invoke(this, new PropertyChangedEventArgs(propertyName));
        }
    }
}
The BaseViewModel class inherits from the interface INotifyPropertyChanged. Therefore, it implements the PropertyChanged event. Also, IsLoading checks for changes with the bool variable and reports them, if any.
PlacesViewModel.cs
using System;
using System.Collections.Generic;
using System.ComponentModel;
using System.Runtime.CompilerServices;
using System.Windows.Input;
using Weather.Connection;
using Weather.Model;
using Weather.View;
using Xamarin.Forms;

namespace Weather.ViewModel
{
    public class PlacesViewModel : INotifyPropertyChanged
    {
        private static Database database = null;

        //public ICommand SelectionCommand => new Command(GoWeather);
        //private async void GoWeather(object obj)
        //{
        //    await Shell.Current.Navigation.PushModalAsync(new WeatherPage());
        //}

        private static Database GetConnection()
        {
            if (database == null)
                database = new Database();
            return database;
        }
        public event PropertyChangedEventHandler PropertyChanged;

        private IEnumerable<Places> _places;

        public IEnumerable<Places> Places
        {
            get
            {
                return _places;
            }

            set
            {
                _places = value;
                OnPropertyChanged();
            }
        }

        private Places selectedPlaces;
        public Places SelectedPlaces
        {
            get { return selectedPlaces; }
            set
            {
                selectedPlaces = value;
                OnPropertyChanged();
            }
        }
        private Places _placess;
        public Places Placess
        {
            get { return _placess; }
            set
            {
                _placess = value;
                OnPropertyChanged();
            }
        }
        public PlacesViewModel()
        {
         //   GetConnection().FullDelete();
            Places = GetConnection().GetAll();
        }
        public ICommand SelectionCommand => new Command(GoToWeatherAsync);
        private async void GoToWeatherAsync(object obj)
        {

            if (selectedPlaces != null)
            {
                var viewModel = new WeatherViewModel(selectedPlaces);
                var weatherPage = new WeatherPage { BindingContext = viewModel };
                await Shell.Current.Navigation.PushAsync(weatherPage);
            }
        }


        public ICommand BackCommand => new Command(Back);
        private async void Back()
        {
            //var mainPage = new AddPlacesPage();//this could be content page
            //var rootPage = new NavigationPage(mainPage);
            //App.Navigation = rootPage.Navigation;

           await App.Current.MainPage.Navigation.PopModalAsync();

        }
        public ICommand TapCommand => new Command(Tap);
        private async void Tap()
        {
            //var mainPage = new AddPlacesPage();//this could be content page
            //var rootPage = new NavigationPage(mainPage);
            //App.Navigation = rootPage.Navigation;
            await App.Current.MainPage.Navigation.PushModalAsync(new AddPlacesPage());
        }
        public ICommand DeleteCommand => new Command(Delete);
        private async void Delete()
        {
            GetConnection().Delete(selectedPlaces.Id);
            Places = GetConnection().GetAll();
        }

        protected virtual void OnPropertyChanged([CallerMemberName] string propertyName = null)
        {
            PropertyChanged?.Invoke(this, new PropertyChangedEventArgs(propertyName));
        }
    }
}
In the PlacesViewModel class, the GetConnection () method first creates a SQLite database connection. Then the GetAll () method of the Database class in the constructor method returns all the recorded data.
AddPlacesViewModel.cs
public class AddPlacesViewModel : INotifyPropertyChanged
{
    private string _cityName;
    public string CityName
    {
        get { return _cityName; }
        set
        {
            _cityName = value;
            OnPropertyChanged();
        }
    }
    private string _cityKey;
    public string CityKey
    {
        get { return _cityKey; }
        set
        {
            _cityKey = value;
            OnPropertyChanged();
        }
    }
    private double _cityLat;
    public double CityLat
    {
        get { return _cityLat; }
        set
        {
            _cityLat = value;
            OnPropertyChanged();
        }
    }
    private double _cityLon;
    public double CityLon
    {
        get { return _cityLon; }
        set
        {
            _cityLon = value;
            OnPropertyChanged();
        }
    }

    private Places places = new Places();
    protected virtual void OnPropertyChanged([CallerMemberName] string propertyName = null)
    {
        PropertyChanged?.Invoke(this, new PropertyChangedEventArgs(propertyName));
    }
    public event PropertyChangedEventHandler PropertyChanged;
    public AddPlacesViewModel()
    {
    }

    public ICommand TapCommand => new Command(Tap);
    private async void Tap()
    {
        Database database = new Database();
        places.CityKey = CityKey;
        places.CityName = CityName;
        places.CityLat = CityLat;
        places.CityLon = CityLon;

        database.Insert(places);
        await App.Current.MainPage.Navigation.PushModalAsync(new PlacesPage());
    }
    public ICommand BackCommand => new Command(Back);
    private async void Back()
    {
        await App.Current.MainPage.Navigation.PopModalAsync();
    }
}
The AddPlacesViewModel class saves the information we enter on the AddPlaces.xaml page to the SQLite database.
7) Create XAML Pages
Add ContentPages named PlacesPage.xaml and AddPlaces.xaml in the Views folder. As their name suggests, these are the pages where we will add locations and display locations
PlacesPage.xaml
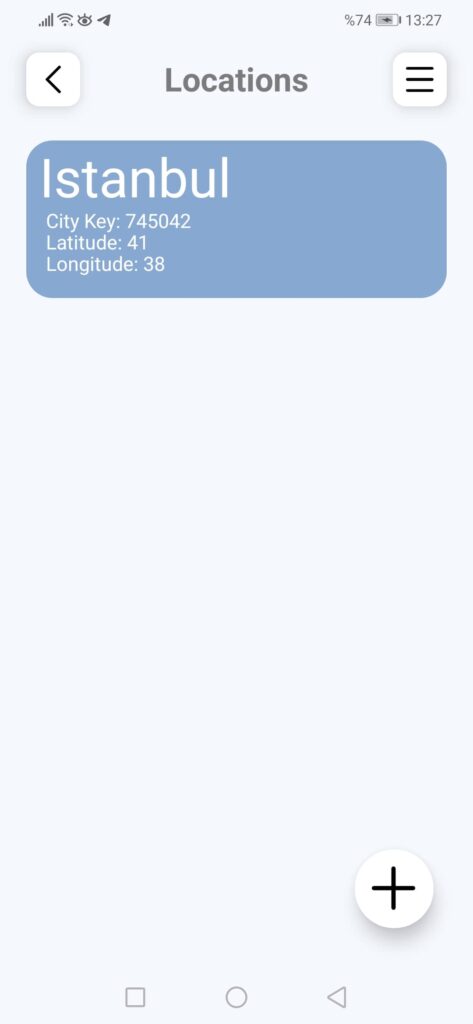
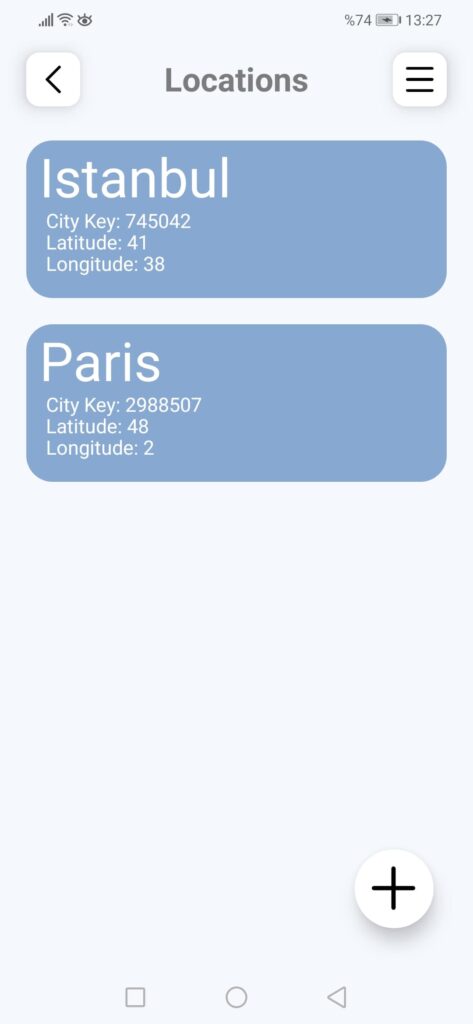
On the PlacesPage.xaml page, I displayed the data from the SQLite database in a CollectionView. I customized the DataTemplate of the CollectionView object with PancakeView. So I got a better interface. I recommend you to use PancakeView plugin for nice UIs.
<?xml version="1.0" encoding="utf-8" ?>
<ContentPage xmlns="http://xamarin.com/schemas/2014/forms"
             xmlns:x="http://schemas.microsoft.com/winfx/2009/xaml"
             xmlns:d="http://xamarin.com/schemas/2014/forms/design"
             xmlns:mc="http://schemas.openxmlformats.org/markup-compatibility/2006"
             xmlns:pancakeview="clr-namespace:Xamarin.Forms.PancakeView;assembly=Xamarin.Forms.PancakeView"
             mc:Ignorable="d"
             x:Class="Weather.View.PlacesPage"
             BackgroundColor="#F5F8FD">
    <AbsoluteLayout >


        <Grid>
            <Grid.RowDefinitions>
                <RowDefinition Height="Auto"/>
                <RowDefinition Height="Auto"/>
            </Grid.RowDefinitions>

            <StackLayout Grid.Row="0" HorizontalOptions="Center" VerticalOptions="Center" Margin="20,10,20,10"  >
                <Grid>
                    <Grid.ColumnDefinitions>
                        <ColumnDefinition Width="Auto" />
                        <ColumnDefinition Width="*" />
                        <ColumnDefinition Width="Auto" />
                        <ColumnDefinition Width="*" />
                        <ColumnDefinition Width="Auto" />
                    </Grid.ColumnDefinitions>

                    <pancakeview:PancakeView Grid.Column="0" WidthRequest="41" HeightRequest="41" CornerRadius="10"  BackgroundColor="#FFF">
                        <pancakeview:PancakeView.Shadow>
                            <pancakeview:DropShadow Color="#000"/>
                        </pancakeview:PancakeView.Shadow>
                        <pancakeview:PancakeView.GestureRecognizers>
                            <TapGestureRecognizer Command="{Binding BackCommand}"/>
                        </pancakeview:PancakeView.GestureRecognizers>
                        <Image Source="back.png" HorizontalOptions="Center" VerticalOptions="Center" Margin="10" />
                    </pancakeview:PancakeView>

                    <Label Grid.Column="2" Text="Locations" VerticalOptions="Center" HorizontalOptions="Center" FontSize="25" FontAttributes="Bold" TextColor="#7B7C7D"/>

                    <pancakeview:PancakeView Grid.Column="4" WidthRequest="41" HeightRequest="41" CornerRadius="10" BackgroundColor="#FFF">
                        <pancakeview:PancakeView.Shadow>
                            <pancakeview:DropShadow Color="#000"   />
                        </pancakeview:PancakeView.Shadow>
                        <Image Source="menu.png" HorizontalOptions="Center" VerticalOptions="Center" Margin="10" />
                    </pancakeview:PancakeView>

                </Grid>
            </StackLayout>

            <CollectionView Grid.Row="1" x:Name="lvStudents" SelectionMode="Single"  ItemsSource="{Binding Places}" SelectedItem="{Binding SelectedPlaces}" SelectionChangedCommand="{Binding SelectionCommand}">

                <CollectionView.ItemsLayout>
                    <GridItemsLayout Orientation="Vertical" />
                </CollectionView.ItemsLayout>
                <CollectionView.ItemTemplate>
                    <DataTemplate >

                        <StackLayout>
                            <VisualStateManager.VisualStateGroups>
                                <VisualStateGroup Name="CommonStates">
                                    <VisualState Name="Normal" >
                                        <VisualState.Setters>
                                            <Setter Property="BackgroundColor" Value="Transparent" />
                                        </VisualState.Setters>
                                    </VisualState>
                                    <VisualState Name="Selected">
                                        <VisualState.Setters>
                                            <Setter Property="BackgroundColor" Value="#b9ceeb" />
                                        </VisualState.Setters>
                                    </VisualState>
                                </VisualStateGroup>
                            </VisualStateManager.VisualStateGroups>

                            <pancakeview:PancakeView BackgroundColor="#87a8d0" HeightRequest="120" WidthRequest="350" CornerRadius="20" HorizontalOptions="Center" VerticalOptions="Center" Margin="20,10,20,10">
                                <Grid >
                                    <Grid.RowDefinitions>
                                        <RowDefinition Height="Auto"/>
                                        <RowDefinition Height="Auto"/>
                                        <RowDefinition Height="Auto"/>
                                        <RowDefinition Height="Auto"/>
                                        <RowDefinition Height="Auto"/>
                                    </Grid.RowDefinitions>
                                    <Grid.ColumnDefinitions>
                                        <ColumnDefinition Width="*"/>
                                        <ColumnDefinition Width="*"/>
                                        <ColumnDefinition Width="*"/>
                                    </Grid.ColumnDefinitions>

                                    <Label Grid.Row="0" Grid.Column="0" Grid.RowSpan="2" Grid.ColumnSpan="2" Text="{Binding CityName}" TextColor="White" FontSize="41" HorizontalOptions="StartAndExpand" VerticalOptions="CenterAndExpand" Margin="10,0,0,0"  />
                                    <Label Grid.Row="2" Grid.Column="0" Grid.ColumnSpan="2" Text="{Binding CityKey, StringFormat='City Key: {0:N0}'}"  TextColor="White" FontSize="15" HorizontalOptions="StartAndExpand" VerticalOptions="CenterAndExpand" Margin="15,-10,0,0"  />
                                    <Label Grid.Row="3" Grid.Column="0" Grid.ColumnSpan="2" Text="{Binding CityLat, StringFormat='Latitude: {0:N0}'}" TextColor="White" FontSize="15" HorizontalOptions="StartAndExpand" VerticalOptions="CenterAndExpand" Margin="15,-10,0,0"  />
                                    <Label Grid.Row="4" Grid.Column="0" Grid.ColumnSpan="2" Text="{Binding CityLon, StringFormat='Longitude: {0:N0}'}" TextColor="White" FontSize="15" HorizontalOptions="StartAndExpand" VerticalOptions="CenterAndExpand" Margin="15,-10,0,0"  />
                                </Grid>
                            </pancakeview:PancakeView>
                        </StackLayout>
                    </DataTemplate>
                </CollectionView.ItemTemplate>
            </CollectionView>

        </Grid>

        <pancakeview:PancakeView AbsoluteLayout.LayoutBounds="0.90,0.95,60,60"
            AbsoluteLayout.LayoutFlags="PositionProportional" BackgroundColor="#fff"  HeightRequest="60" WidthRequest="60" CornerRadius="60"   BackgroundGradientStartPoint="0,0" BackgroundGradientEndPoint="1,0">
            <pancakeview:PancakeView.Shadow>
                <pancakeview:DropShadow Color="#000000" Offset="10,10"   />
            </pancakeview:PancakeView.Shadow>
            <pancakeview:PancakeView.GestureRecognizers>
                <TapGestureRecognizer Command="{Binding TapCommand}" NumberOfTapsRequired="2"/>
            </pancakeview:PancakeView.GestureRecognizers>
            <Image Source="add.png" HeightRequest="33" WidthRequest="33" HorizontalOptions="Center" VerticalOptions="Center"/>

        </pancakeview:PancakeView>

    </AbsoluteLayout>

</ContentPage>
Now navigate to the PlacesPage.xaml.cs class. Add the BindingContext object to the constructor method of this class as follows. Thus, you link ContentPage to the ViewModel class.
    public partial class PlacesPage : ContentPage
    {
        public PlacesPage()
        {
            InitializeComponent();
            BindingContext = new PlacesViewModel();
        }
    }
AddPlacesPage.xaml
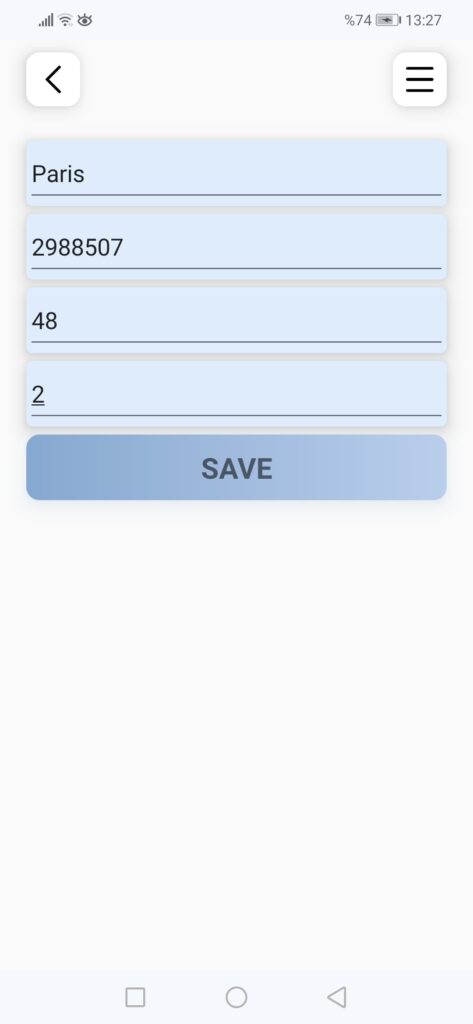
Likewise, I used PancakeView on the AddPlacesPage.xaml page. Here we save the information of the location we will add to the database.
<?xml version="1.0" encoding="utf-8" ?>
<ContentPage xmlns="http://xamarin.com/schemas/2014/forms"
             xmlns:x="http://schemas.microsoft.com/winfx/2009/xaml"
             xmlns:d="http://xamarin.com/schemas/2014/forms/design"
             xmlns:mc="http://schemas.openxmlformats.org/markup-compatibility/2006"
             xmlns:pancakeview="clr-namespace:Xamarin.Forms.PancakeView;assembly=Xamarin.Forms.PancakeView"
             mc:Ignorable="d"
             x:Class="Weather.View.AddPlacesPage">

    <StackLayout >


        <Grid>
            <Grid.RowDefinitions>
                <RowDefinition Height="Auto"/>
                <RowDefinition Height="Auto"/>
            </Grid.RowDefinitions>


            <StackLayout Grid.Row="0" HorizontalOptions="Center" VerticalOptions="Center" Margin="20,10,20,10"  >
                <Grid>
                    <Grid.ColumnDefinitions>
                        <ColumnDefinition Width="Auto" />
                        <ColumnDefinition Width="*" />
                        <ColumnDefinition Width="*" />
                        <ColumnDefinition Width="Auto" />
                    </Grid.ColumnDefinitions>

                    <pancakeview:PancakeView Grid.Column="0" WidthRequest="41" HeightRequest="41" CornerRadius="10"  BackgroundColor="#FFF">
                        <pancakeview:PancakeView.Shadow>
                            <pancakeview:DropShadow Color="#000"/>
                        </pancakeview:PancakeView.Shadow>
                        <pancakeview:PancakeView.GestureRecognizers>
                            <TapGestureRecognizer Command="{Binding BackCommand}"/>
                        </pancakeview:PancakeView.GestureRecognizers>
                        <Image Source="back.png" HorizontalOptions="Center" VerticalOptions="Center" Margin="10" />
                    </pancakeview:PancakeView>
                    <pancakeview:PancakeView Grid.Column="3" WidthRequest="41" HeightRequest="41" CornerRadius="10" BackgroundColor="#FFF">
                        <pancakeview:PancakeView.Shadow>
                            <pancakeview:DropShadow Color="#000"   />
                        </pancakeview:PancakeView.Shadow>
                        <Image Source="menu.png" HorizontalOptions="Center" VerticalOptions="Center" Margin="10" />
                    </pancakeview:PancakeView>

                </Grid>
            </StackLayout>


            <StackLayout Grid.Row="1" HorizontalOptions="Center" VerticalOptions="Center" Margin="20,10,20,10"  >

                <pancakeview:PancakeView BackgroundColor="#deecfc"  HeightRequest="50" WidthRequest="350" CornerRadius="5" HorizontalOptions="Center" VerticalOptions="Center" BackgroundGradientStartPoint="0,0" BackgroundGradientEndPoint="1,0">
                    <Entry x:Name="cityName" Placeholder="CityName" HorizontalOptions="FillAndExpand" Text="{Binding CityName}"></Entry>
                    <pancakeview:PancakeView.Shadow>
                        <pancakeview:DropShadow Color="#000000" Offset="10,10" />
                    </pancakeview:PancakeView.Shadow>
                </pancakeview:PancakeView>

                <pancakeview:PancakeView BackgroundColor="#deecfc" HeightRequest="50" WidthRequest="350" CornerRadius="5" HorizontalOptions="Center" VerticalOptions="Center" BackgroundGradientStartPoint="0,0" BackgroundGradientEndPoint="1,0">
                    <Entry x:Name="cityKey" Placeholder="CityKey" HorizontalOptions="FillAndExpand" Text="{Binding CityKey}"></Entry>

                    <pancakeview:PancakeView.Shadow>
                        <pancakeview:DropShadow Color="#000000" Offset="10,10" />
                    </pancakeview:PancakeView.Shadow>
                </pancakeview:PancakeView>

                <pancakeview:PancakeView BackgroundColor="#deecfc" HeightRequest="50" WidthRequest="350" CornerRadius="5" HorizontalOptions="Center" VerticalOptions="Center" BackgroundGradientStartPoint="0,0" BackgroundGradientEndPoint="1,0">
                    <Entry x:Name="cityLat" Placeholder="CityLat" HorizontalOptions="FillAndExpand" Text="{Binding CityLat}"></Entry>

                    <pancakeview:PancakeView.Shadow>
                        <pancakeview:DropShadow Color="#000000" Offset="10,10" />
                    </pancakeview:PancakeView.Shadow>
                </pancakeview:PancakeView>

                <pancakeview:PancakeView BackgroundColor="#deecfc" HeightRequest="50" WidthRequest="350" CornerRadius="5" HorizontalOptions="Center" VerticalOptions="Center" BackgroundGradientStartPoint="0,0" BackgroundGradientEndPoint="1,0">
                    <Entry x:Name="cityLon" Placeholder="CityLon" HorizontalOptions="FillAndExpand" Text="{Binding CityLon}"></Entry>

                    <pancakeview:PancakeView.Shadow>
                        <pancakeview:DropShadow Color="#000000" Offset="10,10" />
                    </pancakeview:PancakeView.Shadow>
                </pancakeview:PancakeView>

                <pancakeview:PancakeView BackgroundColor="#87a8d0" HeightRequest="50" WidthRequest="350" CornerRadius="10" HorizontalOptions="Center" VerticalOptions="Center" BackgroundGradientStartPoint="0,0" BackgroundGradientEndPoint="1,0">
                    <Label Text="SAVE" FontSize="Large" FontAttributes="Bold" HorizontalTextAlignment="Center" VerticalTextAlignment="Center"/>
                    <pancakeview:PancakeView.GestureRecognizers>
                        <TapGestureRecognizer Command="{Binding TapCommand}"/>
                    </pancakeview:PancakeView.GestureRecognizers>
                    <pancakeview:PancakeView.BackgroundGradientStops>
                        <pancakeview:GradientStopCollection>
                            <pancakeview:GradientStop Color="#87a8d0" Offset="0" />
                            <pancakeview:GradientStop Color="#b9ceeb" Offset="1" />
                        </pancakeview:GradientStopCollection>
                    </pancakeview:PancakeView.BackgroundGradientStops>
                    <pancakeview:PancakeView.Shadow>
                        <pancakeview:DropShadow Color="#87a8d0" Offset="10,10" />
                    </pancakeview:PancakeView.Shadow>
                </pancakeview:PancakeView>
            </StackLayout>

        </Grid>


    </StackLayout>
</ContentPage>
Again, go to the AddPlacesPage.xaml.cs class. Add the BindingContext object to the constructor method of this class as follows. Thus, you link ContentPage to the ViewModel class.
public partial class AddPlacesPage : ContentPage
{
    public AddPlacesPage()
    {
        InitializeComponent();
        BindingContext = new AddPlacesViewModel();
    }
}
The application is now ok. Let’s look at how the app works together.
Conclusion
As a result, SQLite exceedingly meets the database needs in mobile applications. Being small and fast is one of the reasons why it is preferred. In addition, SQLite is public and open source. So it is free to use for any purpose.
In this article I showed how to add a SQLite native database to a Xamarin.Forms application. I went over the Weather application, which was my previous project. I hope it was useful.
If you’re still not sure what to do, or if you got any errors, then I suggest you use the comment section below and let me know! I am here to help!
Also, share this blog post on social media and help more people learn.





In PlacesPage View, you bind in the collectionview of Places commands that not appear in your tutorial:
I don´t understand how do you achieve to pass from placespage view to the addplaces view. I know that it is related with the command in the SelectedItem binding, could you add the code definitions of SelectedPlaces and SelectionCommand?
Thank you for alerting. I added the PlacesViewModel codes.