How To Display Popup Message in Xamarin.Forms
Contents
We all know what popup is. We use popups when the user needs to confirm or reject a selection. Or sometimes we display it in the middle of the screen to show warning messages. Thus, we aim to increase the user experience of the mobile application. So popups are very important for a mobile application.
At the end of this article, you will be able to show popups in a Xamarin.Forms applications. You will also customize the layout of popups and add animation. This time, I will make use of one of the most useful plugins, Syncfusion.Xamarin.SfPopupLayout, not with Xamarin’s own controls.
So, let’s started. Follow the steps below in order.
1) Install Syncfusion.Xamarin.SfPopupLayout Plugin
First, you need to install Syncfusion.Xamarin.SfPopupLayout plugin in your Xamarin.Forms project. There are two ways to do this. You can find details in the How To Install and Manage NuGet Packages article.
Type the following code into Package Manager Console and run it.
Install-Package Syncfusion.Xamarin.SfPopupLayout -Version 18.4.0.32Alternatively, you can install the plugin from NuGet Package Manager. First, right click on the project folder. Then click on Manage NuGet Packages for Solution option. Go to the Browse tab in the window that opens. Finally, type Syncfusion.Xamarin.SfPopupLayout in the Search bar and search. And install the plugin on all platforms.
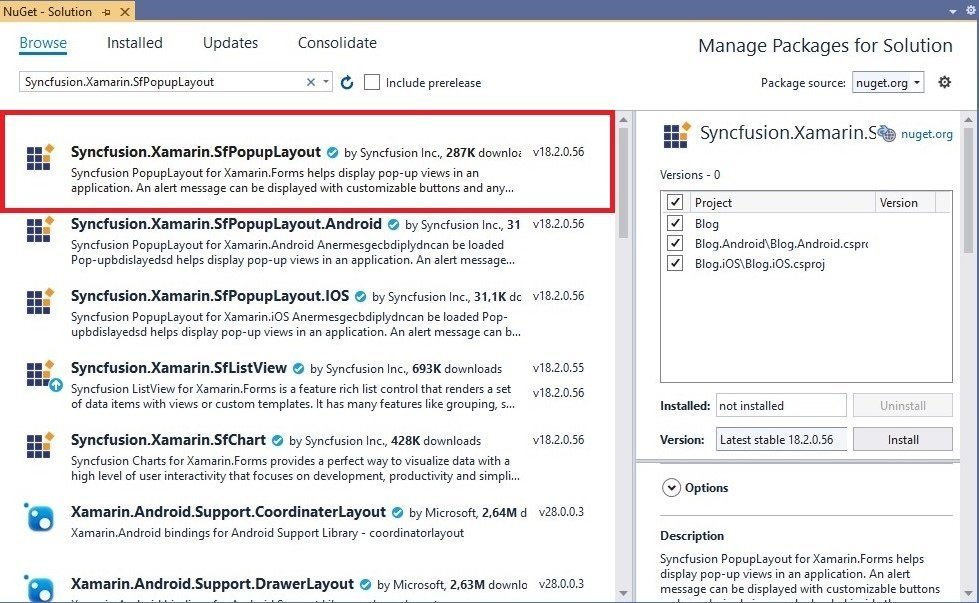
If you use Syncfusion plugins in the project without Registration License, you will get a warning popup. To use this plugin without any warning messages, you must register with Syncfusion and obtain a Registration License. I explained how to register for Syncfusion and get License.
Let me explain briefly as follows.
- First create an account in Syncfusion.
- Then get a Registration License for Xamarin.Forms apps.
- Finally, add this license to the App() constructor method of App.xaml.cs class as follows.
public App()
{
    Syncfusion.Licensing.SyncfusionLicenseProvider.RegisterLicense("YOUR REGISTER LICENCE");
    InitializeComponent();
    MainPage = new AppShell();
}
2) Launch the SfPopupLayout on Each Platform
To use the SfPopupLayout plugin in Xamarin, you must launch it on a platform specific. So, after installing the plugin, you cannot use it directly.
Android
To launch the SfPopupLayout plugin on the Android platform, go to the MainActivity.cs class. Then call the Init() method inside the onCreate () method. As follows. Thus, SfPopupLayout will initialize every time MainActivity launch.
protected override void OnCreate(Bundle bundle)
{
    ...
    global::Xamarin.Forms.Forms.Init(this, bundle);
    Syncfusion.XForms.Android.PopupLayout.SfPopupLayoutRenderer.Init();
    LoadApplication(new App());
}
iOS
To launch the SfPopupLayout plugin on the iOS platform, go to the AppDelegate.cs class. Then call the Init () method inside the FinishedLaunching () method. As follows. Thus, every time the AppDelegate class launch, the SfPopupLayout plugin will also initialize.
public override bool FinishedLaunching(UIApplication app, NSDictionary options)
{
    …
    global::Xamarin.Forms.Forms.Init ();
    Syncfusion.XForms.iOS.PopupLayout.SfPopupLayoutRenderer.Init();
    LoadApplication (new App ());
    …
}
3) Consume SfPopupLayout in XAML
After installing the plugin and launching it on a platform specific, it’s time to make a sample. In this step, I will first create a simple popup with the SfPopupLayout plugin. Later I will customize this popup. Next, I’ll create a full screen popup. And finally, I’ll show you how to animate popups.
Now, you need a ContentPage to show popups. Right click on the project folder and add a ContentPage named PopupPage.xaml.
Then you need to add the sfPopup namespace to ContentPage. Because the namespace is required to create views with the SfPopupLayout plugin. Paste the following code inside the <ContentPage> definition.
xmlns:sfPopup="clr-namespace:Syncfusion.XForms.PopupLayout;assembly=Syncfusion.SfPopupLayout.XForms"Create Simple Popup
In our first example, there is a button inside the page. When the user clicks the button, a popup opens. This popup is a simple popup that gets user confirmation.
A SfPopup is added to ContentPage as follows. You can add views in StackLayout in SfPopup.
    <ContentPage.Content>
        <sfPopup:SfPopupLayout x:Name="popupLayout">
            <sfPopup:SfPopupLayout.Content>
                <StackLayout x:Name="mainLayout">
                    <Button x:Name="clickToShowPopup" Text="ClickToShowPopup"
               VerticalOptions="Start" HorizontalOptions="FillAndExpand"
                Clicked="ClickToShowPopup_Clicked"/>
                </StackLayout>
            </sfPopup:SfPopupLayout.Content>
        </sfPopup:SfPopupLayout>
    </ContentPage.Content>
Clicked() method in PopupPage.xaml.cs
public partial class PopupPage : ContentPage
    {
    public PopupPage()
    {
        InitializeComponent();
    }
    private void ClickToShowPopup_Clicked(object sender, EventArgs e)
    {
        popupLayout.Show();
    }
}
Customize Popup Layouts
You can customize the pop-ups according to your wishes. In the example below you will see a screen with a red background with a warning message inside.
    <sfPopup:SfPopupLayout x:Name="popupLayout">
        <sfPopup:SfPopupLayout.PopupView>
            <sfPopup:PopupView>
                <sfPopup:PopupView.ContentTemplate>
                    <DataTemplate>
                        <Label Text="This is a warning" BackgroundColor="Red" HorizontalTextAlignment="Center"/>
                    </DataTemplate>
                </sfPopup:PopupView.ContentTemplate>
            </sfPopup:PopupView>
        </sfPopup:SfPopupLayout.PopupView>
        <sfPopup:SfPopupLayout.Content>
            <StackLayout x:Name="layout">
                <Button x:Name="clickToShowPopup" Text="ClickToShowPopup" VerticalOptions="Start"
               HorizontalOptions="FillAndExpand"  Clicked="ClickToShowPopup_Clicked" />
            </StackLayout>
        </sfPopup:SfPopupLayout.Content>
    </sfPopup:SfPopupLayout>
Full Screen Popup
Let’s say you want the user to fill out a form in the application. You may need this when selling tickets or validating. Here, you can create a full screen popup with SfPopupLayout and quickly get data from the user.
You can create full screen popups as follows. If you want, you can customize in the <DataTemplate>.
    <sfPopup:SfPopupLayout x:Name="popupLayout">
        <sfPopup:SfPopupLayout.PopupView>
            <sfPopup:PopupView AppearanceMode="TwoButton"
                                           AcceptButtonText="SAVE"
                                           DeclineButtonText="CANCEL">
                <sfPopup:PopupView.HeaderTemplate>
                    <DataTemplate>
                        <Label Text="ADD EVENT" VerticalTextAlignment="Center" HorizontalTextAlignment="Start" FontAttributes="Bold"/>
                    </DataTemplate>
                </sfPopup:PopupView.HeaderTemplate>
                <sfPopup:PopupView.ContentTemplate>
                    <DataTemplate>
                        <Grid BackgroundColor="White" Padding="15,20,15,0">
                            <Grid.RowDefinitions>
                                <RowDefinition Height="100"/>
                                <RowDefinition Height="100"/>
                                <RowDefinition Height="30"/>
                                <RowDefinition Height="50"/>
                                <RowDefinition Height="30"/>
                                <RowDefinition Height="50"/>
                                <RowDefinition>
                                    <RowDefinition.Height>
                                        <OnPlatform x:TypeArguments="GridLength" Android="55" iOS="55">
                                            <On Platform="UWP" Value="75"/>
                                        </OnPlatform>
                                    </RowDefinition.Height>
                                </RowDefinition>
                            </Grid.RowDefinitions>

                            <Grid Grid.Row="0" BackgroundColor="#F3F3F9" Margin="0,15,0,0">
                                <textinput:SfTextInputLayout Hint="Event name" ContainerType="Outlined" BackgroundColor="Transparent">
                                    <Entry HeightRequest="75" BackgroundColor="Transparent"/>
                                </textinput:SfTextInputLayout>
                            </Grid>

                            <Grid Grid.Row="1" BackgroundColor="#F3F3F9" Margin="0,15,0,0">
                                <textinput:SfTextInputLayout Hint="Location" ContainerType="Outlined" BackgroundColor="Transparent">
                                    <Entry HeightRequest="75" BackgroundColor="Transparent"/>
                                </textinput:SfTextInputLayout>
                            </Grid>

                            <Label Grid.Row="2" Text="From" Margin="0,10,0,0"/>
                            <Grid Grid.Row="3">
                                <Grid.ColumnDefinitions>
                                    <ColumnDefinition/>
                                    <ColumnDefinition/>
                                </Grid.ColumnDefinitions>
                                <DatePicker Grid.Column="0" FontSize="Small"/>
                                <TimePicker Grid.Column="1" FontSize="Small"/>
                            </Grid>

                            <Label Grid.Row="4" Text="To" Margin="0,10,0,0"/>
                            <Grid Grid.Row="5">
                                <Grid.ColumnDefinitions>
                                    <ColumnDefinition/>
                                    <ColumnDefinition/>
                                </Grid.ColumnDefinitions>
                                <DatePicker Grid.Column="0" FontSize="Small"/>
                                <TimePicker Grid.Column="1" FontSize="Small"/>
                            </Grid>
                            <Grid Grid.Row="6" Margin="0,35,0,0">
                                <Grid.ColumnDefinitions>
                                    <ColumnDefinition Width="Auto"/>
                                    <ColumnDefinition Width="Auto"/>
                                </Grid.ColumnDefinitions>
                                <Switch Grid.Column="0"/>
                                <Label Grid.Column="1" Text="All-day">
                                    <Label.Margin>
                                        <OnPlatform x:TypeArguments="Thickness">
                                            <On Platform="UWP" Value="0,10,0,0"/>
                                        </OnPlatform>
                                    </Label.Margin>
                                </Label>
                            </Grid>
                        </Grid>
                    </DataTemplate>
                </sfPopup:PopupView.ContentTemplate>
            </sfPopup:PopupView>
        </sfPopup:SfPopupLayout.PopupView>
        <sfPopup:SfPopupLayout.Content>
            <StackLayout x:Name="layout">
                <Button x:Name="clickToShowPopup" Text="ClickToShowPopup"
               VerticalOptions="Start"   HorizontalOptions="FillAndExpand" Clicked="ClickToShowPopup_Clicked" />
            </StackLayout>
        </sfPopup:SfPopupLayout.Content>
    </sfPopup:SfPopupLayout>
Clicked method in PopupPage.xaml.cs
public partial class PopupPage : ContentPage
{
    public PopupPage()
    {
        InitializeComponent();
    }
    private void ClickToShowPopup_Clicked(object sender, EventArgs e)
    {
        popupLayout.PopupView.IsFullScreen = true;
        popupLayout.IsOpen = true;
    }
}
Popup Animations
The SfPopupLayout plugin provides animations that you can apply when opening or closing popups. These animations are: Zoom, Fade, SlideOnLeft, SlideOnRight, SlideOnTop, SlideOnBottom, None. You can animate in popups simply by setting AnimationMode.
PopupPage.xaml
    <sfPopup:SfPopupLayout x:Name="popupLayout">
        <sfPopup:SfPopupLayout.PopupView>
            <sfPopup:PopupView AnimationMode="SlideOnLeft" />
        </sfPopup:SfPopupLayout.PopupView>
        <sfPopup:SfPopupLayout.Content>
            <StackLayout x:Name="layout">
                <Button x:Name="clickToShowPopup" Text="ClickToShowPopup"
               VerticalOptions="Start"   HorizontalOptions="FillAndExpand" Clicked="ClickToShowPopup_Clicked" />
            </StackLayout>
        </sfPopup:SfPopupLayout.Content>
    </sfPopup:SfPopupLayout>
PopupPage.xaml.cs
public partial class PopupPage : ContentPage
{
    public PopupPage()
    {
        InitializeComponent();
    }
    private void ClickToShowPopup_Clicked(object sender, EventArgs e)
    {
        popupLayout.Show();
    }
}
Conclusion
Popups are very important for the usability of a mobile application. You may need to ask the user to confirm or reject a selection when necessary. Or you can ask the user to quickly fill out a form. These are factors that improve the user experience of a mobile application.
It is possible to do all this with the SfPopupLayout plugin. With SfPopupLayout, you can create and customize different types of popups. You can even enable these popups to open and close animations.
In this post, I explained how to use the SfPopupLayout plugin in a Xamarin.Forms project. I hope it was useful.
If you’re still not sure what to do, or if you got any errors, then I suggest you use the comment section below and let me know! I am here to help!
Also, share this blog post on social media and help more people learn.

