Xamarin.Forms Creating Onboarding Screen
Contents
When you run the mobile applications you have installed on your device for the first time, you will see helpful screens. These screens ask you to choose your interests and show content based on your choices. Sometimes they display a short tutorial to enhance the user experience. These are called Onboarding screens.
In this article, I will briefly talk about the onboarding screen and its types. Later, I will make an example applying the MVVM model. Finally, I will do version tracking with VersionTracking.
So, let’s started.
The secret to being successful in mobile applications is to increase the user experience. Therefore, the design of the application is as important as the back-end. Unfortunately, working well isn’t enough for a mobile app.
The first thing a user sees in a mobile application is the application icon. Later when he launches the app he sees the Splash Screen until the main activity opens. If the user is using the application for the first time, users should encounter an auxiliary screen before the main screen. We can say that this is the application guide.
So the onboarding screen is just as important as the icon and splash screen for a successful application.
What is the Onboarding Screen?
Mobile applications greet the first time user with an onboarding screen. Thus, it helps the user to understand how to use the application. Besides, the user becomes familiar with the application and the user experience increases.
There are generally three different onboarding models, according to Material Design. Each application welcomes the user with an onboarding screen where it can achieve better results.
1 Self-Select onboarding type asks the user to customize their experience. We usually see this model in course applications. Such applications ask the user which category of courses they want to take.
2 Quickstart onbording model prompts the user to select the areas of interest. For example, when you log in to Twitter for the first time, it asks you to choose your interests. Then, it brings up the accounts you can follow according to your choices. social media applications prefer the Quickstart model.
3 Top User Benefits model, on the other hand, shows the user the properties of the application with a loop and animation.
Making an Onboarding Screen
In this article, I will show how to build an onboarding screen for Xamarin.Forms applications using the Top User Benefits model.
This will consist of a three-page CarouselView that shows the features of the application with an SVG view and short descriptions. I will use the Xamarin.FFImageLoading.Svg.Forms plugin to show SVG files.
I will also implement the MVVM model in the application. So you should be familiar with MVVM architecture. I will use Refractored.MvvmHelpers plugin to implement the MVVM model. This plugin is one of the most preferred plugins for MVVM architecture.
You can reach the result by following the steps below in order.
1) Install and Initialize Plugins
We will use the Refractored.MvvmHelpers and Xamarin.FFImageLoading.Svg.Forms plugins while doing the onboarding screen. You can search the plugins from the Nuget Package Manager and download them from there. I recommend you to do if there are updates.
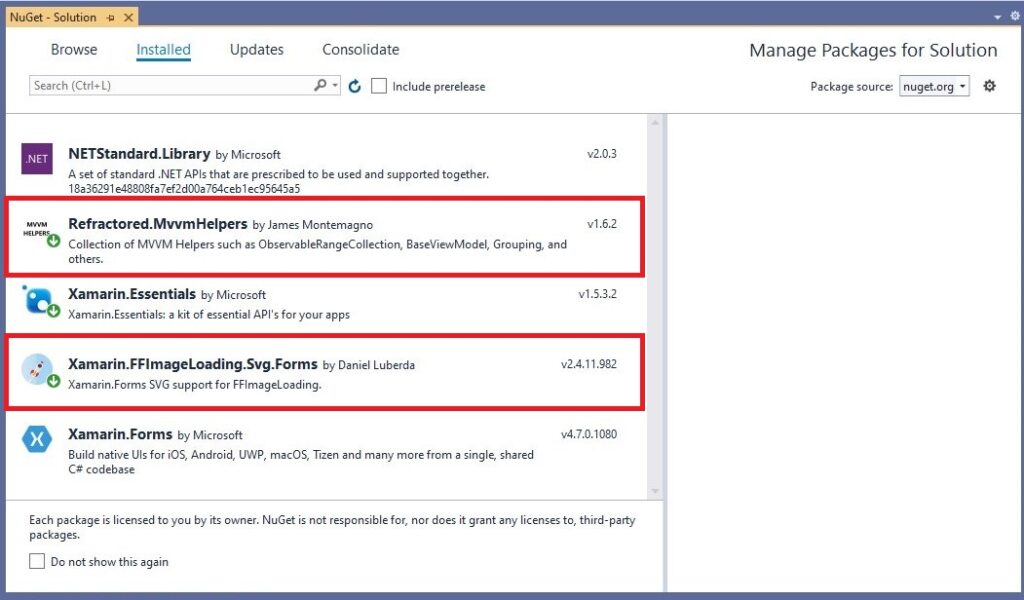
You cannot use Xamarin.FFImageLoading.Svg.Forms plugin directly in Xamarin.Forms. For this you have to call the initiator method for each platform. Paste the following snippet of code into the onCreate() method of MainActivity to launch this plugin on Android.
FFImageLoading.Forms.Platform.CachedImageRenderer.Init(enableFastRenderer: true);And then add the required namespaces. The IDE will give you the necessary warnings anyway.
2) Add SVG Images
In this project, I used image files with SVG extension. Because files with SVG extensions take less space than JPG and PNG files. In addition, in my research, I saw that the developers use images with the SVG extension.
Since we cannot view SVG files directly in Xamarin, we will use the Xamarin.FFImageLoading.Svg.Forms plugin.
First of all, you should find three SVG files to use in your project. These will be the images you will use for the CarouselView. Then put these files in the Resources/drawable folder.
3) Implementing the MVVM Model
I showed you how to apply the MVVM model to the project in my previous article. That is why I will not go into length here.
Onboarding Model
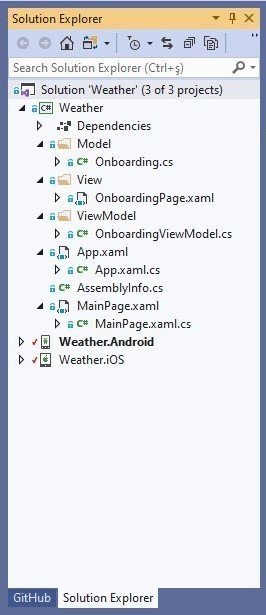
First, right click on the project and add a folder named Models. Then add a class named Onboarding.cs to this folder. Title, Content and ImageUrl variables that exist on each page in the CarouselView will be kept in the model class. As the name implies, this is a model, mold.
public class Onboarding
{
    public string Title { get; set; }
    public string Content { get; set; }
    public string ImageUrl { get; set; }
}
Onboarding ViewModel
After creating the model class, a ViewModel class is required to process the data. The purpose of this class is to create a ViewModel for the View using data from the Model class.
View shows this ViewModel class by Bind it to the user. In the MVVM model, the ViewModel class knows the Model layer but not the View layer.
Now right click on the project and add a folder named ViewModels. Then add a class named OnboardingViewModel.cs to this folder.
To implement the MVVM model in the OnboardingViewModel class, it must inherit the MvvmHelpers.BaseViewModel class of the Refractored.MvvmHelpers plugin.
The purpose of the OnboardingViewModel.cs class in this project is to change the functions of the buttons, images and explanations according to different positions. After all, when the user reaches the last page in the CarouselView, the NEXT button will change to GOT IT. Clicking the GOT IT button will start MainActivity.
public class OnboardingViewModel : MvvmHelpers.BaseViewModel
{
    private ObservableCollection<Onboarding> items;
    private int position;
    private string nextButtonText;
    private string skipButtonText;

    public OnboardingViewModel()
    {
        SetNextButtonText("NEXT");
        SetSkipButtonText("SKIP");
        OnBoarding();
        LaunchNextCommand();
        LaunchSkipCommand();
    }

    private void SetNextButtonText(string nextButtonText) => NextButtonText = nextButtonText;
    private void SetSkipButtonText(string skipButtonText) => SkipButtonText = skipButtonText;

    private void OnBoarding()
    {
        Items = new ObservableCollection<Onboarding>
            {
                new Onboarding
                {
                    Title = "Welcome",
                    Content = "Welcome to Weather. Let's start.",
                    ImageUrl = "welcome.svg"
                },
                new Onboarding
                {
                    Title = "Latest Data",
                    Content = "Weather shows you the data from \n the API.",
                    ImageUrl = "show.svg"
                },
                new Onboarding
                {
                    Title = "Instant notifications",
                    Content = "Get notified according to the changes \n you want.",
                    ImageUrl = "notification.svg"
                }
            };
    }

    private void LaunchNextCommand()
    {

        NextCommand = new Command(() =>
        {
            if (LastPositionReached())
            {
                ExitOnBoarding();
            }
            else
            {
                MoveToNextPosition();
            }
        });
    }
    private void LaunchSkipCommand()
    {
        SkipCommand = new Command(() =>
        {
            ExitOnBoarding();

        });
    }

    private static void ExitOnBoarding()
        => Application.Current.MainPage.Navigation.PopModalAsync();

    private void MoveToNextPosition()
    {
        var nextPosition = ++Position;
        Position = nextPosition;
    }

    private bool LastPositionReached()
        => Position == Items.Count - 1;

    public ObservableCollection<Onboarding> Items
    {
        get => items;
        set => SetProperty(ref items, value);
    }

    public string NextButtonText
    {
        get => nextButtonText;
        set => SetProperty(ref nextButtonText, value);
    }
    public string SkipButtonText
    {
        get => skipButtonText;
        set => SetProperty(ref skipButtonText, value);
    }

    public int Position
    {
        get => position;
        set
        {
            if (SetProperty(ref position, value))
            {
                UpdateNextButtonText();
            }
        }
    }

    private void UpdateNextButtonText()
    {
        if (LastPositionReached())
        {
            SetNextButtonText("GOT IT");
        }
        else
        {
            SetNextButtonText("NEXT");
        }
    }

    public ICommand NextCommand { get; private set; }
    public ICommand SkipCommand { get; private set; }
}
Onboarding View
In the MVVM model, Views is the layer the user sees. Views come after Model and View Model layers. They bind the ViewModel class and show it in views.
In this view, we will show the user the properties of the application in a loop in CarouselView. And the user will be able to get to the last page by swiping left and right with IndicatorView.
First, right click on the project and add a folder called Views. Then add a ContentPage named OnboardingPage.xaml to this folder.
Then bind the OnboardingViewModel.cs class with BindingContext into ContentPage. After Bind the ViewModel class, show the contents to the user with CarouselView and IndicatorView in GridView.
<ContentPage.BindingContext>
    <ob:OnboardingViewModel/>
</ContentPage.BindingContext>
Define the colors and customizations you will use in so you don’t have to write them over and over again.
<ContentPage.Resources>
    <ResourceDictionary>
        <Color x:Key="IndicatorColor">#B1B493</Color>
        <Color x:Key="SkipButtonColor">#707070</Color>
        <Color x:Key="NextButtonColor">#B1B493</Color>
        <Style TargetType="Label">
            <Setter Property="TextColor" Value="{StaticResource SkipButtonColor}" />
            <Setter Property="HorizontalTextAlignment" Value="Center" />
            <Setter Property="HorizontalOptions" Value="Center" />
        </Style>
    </ResourceDictionary>
</ContentPage.Resources>
<Grid>
<Grid.RowDefinitions>
<RowDefinition Height="*"/>
<RowDefinition Height="*"/>
<RowDefinition Height="*"/>
</Grid.RowDefinitions>
<Grid.ColumnDefinitions>
<ColumnDefinition Width="*"/>
<ColumnDefinition Width="*"/>
<ColumnDefinition Width="*"/>
</Grid.ColumnDefinitions>
<CarouselView x:Name="onBoardingCarousel" IndicatorView="IndicatorView"
Grid.Row="0" Grid.ColumnSpan="3" Grid.RowSpan="3"
ItemsSource="{Binding Items}"
Position="{Binding Position}">
<CarouselView.ItemTemplate>
<DataTemplate x:DataType="ob1:Onboarding">
<ContentView>
<FlexLayout Direction="Column"
JustifyContent="SpaceEvenly">
<ffimageloadingsvg:SvgCachedImage
Grid.Row="0"
Source="{Binding ImageUrl}"
Aspect="AspectFill"
WidthRequest="300"
FlexLayout.AlignSelf="Center"/>
<Label Grid.Row="1"
Text="{Binding Title}"
FontAttributes="Bold"
FontSize="Title" />
<Label Grid.Row="2"
Text="{Binding Content}"
FontSize="Body"/>
</FlexLayout>
</ContentView>
</DataTemplate>
</CarouselView.ItemTemplate>
</CarouselView>
<IndicatorView x:Name="IndicatorView"
Grid.Row="3"
Grid.Column="1"
IndicatorSize="7"
IndicatorsShape="Circle"
IndicatorColor="{StaticResource IndicatorColor}"
SelectedIndicatorColor="DarkGray"
HorizontalOptions="Center"
VerticalOptions="Center">
</IndicatorView>
<Button Grid.Row="3"
Grid.Column="0"
FontSize="Medium"
FontAttributes="Bold"
BackgroundColor="Transparent"
TextColor="{StaticResource SkipButtonColor}"
Text="{Binding SkipButtonText}"
Command="{Binding SkipCommand}"/>
<Button Grid.Row="3"
Grid.Column="2"
FontSize="Medium"
CornerRadius="50"
Margin="0,65,20,65"
FontAttributes="Bold"
BackgroundColor="{StaticResource NextButtonColor}"
TextColor="{StaticResource SkipButtonColor}"
Text="{Binding NextButtonText}"
Command="{Binding NextCommand}"/>
</Grid>Define SetFlags for IndicatorView in MainActivity. Otherwise, the application returns an error.
Xamarin.Forms.Forms.SetFlags(new string[] { "IndicatorView_Experimental" });The statusBarColor and navigationBarColor values of the application appear in the default colors of the Material Design Theme of Xamarin.Forms. So the shades of blue that we are used to.
I recommend that you make the statusBarColor and navigationBarColor colors the same as your background color to ensure unity on the application screen. Otherwise, a proper image will not appear. I explained how to change the Material Design Theme in my previous article.
To change the statusBarColor and navigationBarColor, add the following codes in the <style> tag in the .Android/Resources/values/styles.xml file:
<item name="android:statusBarColor">#d4d6c8</item>
<item name="android:navigationBarColor">#d4d6c8</item>
4) VersionTracking
As I mentioned above, the Onboarding screens will only appear once when the user starts the application for the first time. So the Onboarding screen won’t open every time. So how do we do that. Xamarin.Essentials is here to help us.
Add the following version tracking code to the OnStart() method of the App.xaml.cs class to do version tracking.
VersionTracking.Track();Then add version control codes to MainPage() constructor method in MainPage.xaml.cs class.
public MainPage()
{
    InitializeComponent();
    if (VersionTracking.IsFirstLaunchEver)
    {
        Navigation.PushModalAsync(new OnboardingPage());
    }
}
Now the OnStart() method will follow the version. MainPage() constructor method will check with IsFirstLaunchEver whether the application runs for the first time. If the application has run for the first time, it will push the user to the OnboardingPage view.
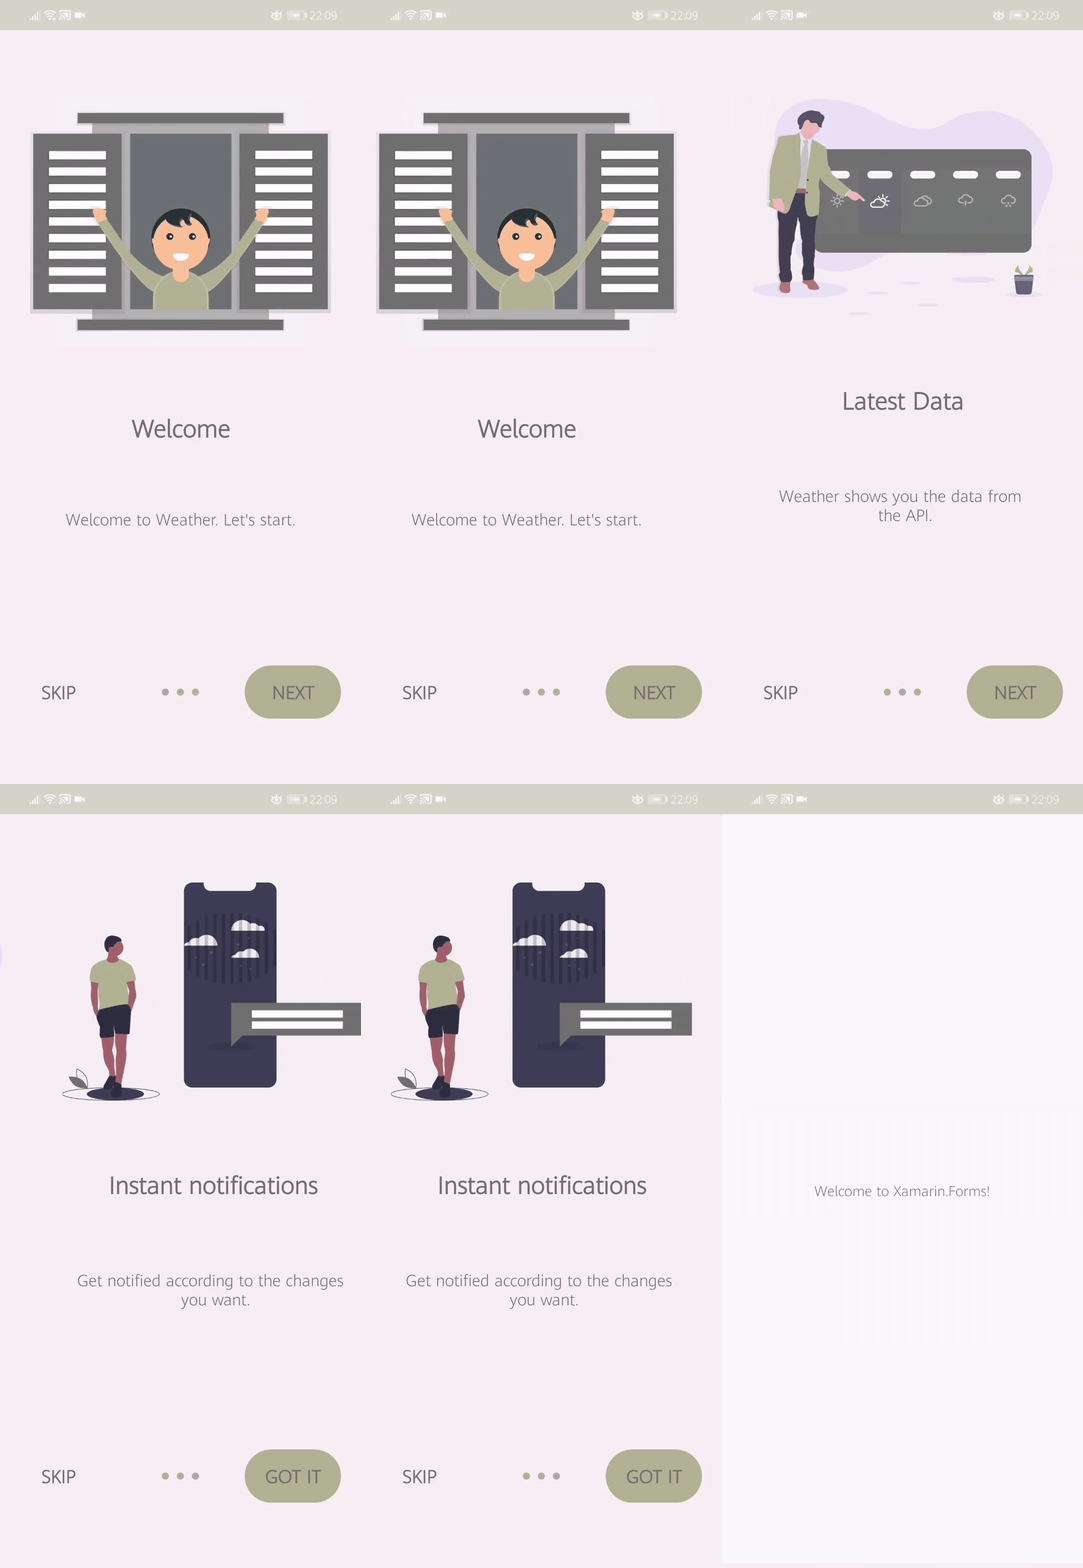
After completing all the steps, you can start the application. The first time the application runs, it will look like this:
Conclusion
Design is very important to increase the user experience in mobile applications. Unfortunately, the application does not work well on its own to reach more users. That’s why you should attach importance to design as much as the back-end.
The onboarding screen is one of the important steps to be taken after the correct icon design and splash screen. I recommend that you do not skip this step for a successful mobile application.
In this article, I showed you the Onboarding screen construction by applying the MVMM model for your Xamarin.Forms applications. I hope it was useful.
If you’re still not sure what to do, or if you got any errors, then I suggest you use the comment section below and let me know! I am here to help!
Also, share this blog post on social media and help more people learn.


