Xamarin.Forms ListView Grouping
Contents
Grouping sequential data to reduce data complexity after connecting data to ListView in mobile apps is a good solution. We often see this when enumerating saved contacts in phonebook and messaging applications. It may seem complicated to do this with existing Xamarin controls. Fortunately, it’s easy to do with the SfListView plugin.
At the end of this article, you will be able to sort the data in the ListView alphabetically and group them by the first character of the ordered data. This time, I will use one of the most useful plugins, Syncfusion.Xamarin.SfListView, not with Xamarin’s own controls. Also, in this sample project, I will apply the MVVM model with Data Binding.
So, let’s started. Follow the steps below in order.
1) Install Syncfusion.Xamarin.SfListView Plugin
First, you need to install Syncfusion.Xamarin.SfListView plugin in your Xamarin.Forms project. There are two ways to do this. You can find details in the How To Install and Manage NuGet Packages article.
Type the following code into Package Manager Console and run it.
Install-Package Syncfusion.Xamarin.SfListView -Version 18.4.0.34Alternatively, you can install the plugin from NuGet Package Manager. First, right click on the project folder. Then click on Manage NuGet Packages for Solution option. Go to the Browse tab in the window that opens. Finally, type Syncfusion.Xamarin.SfListView in the Search bar and search. And install the plugin on all platforms.
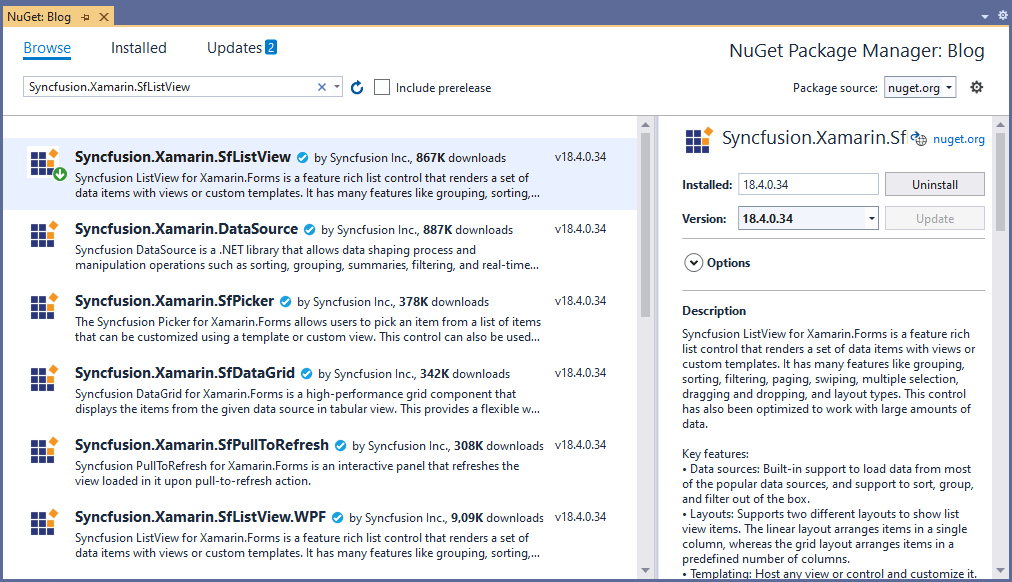
If you use Syncfusion plugins in the project without Registration License, you will get a warning popup. To use this plugin without any warning messages, you must register with Syncfusion and obtain a Registration License. I explained how to register for Syncfusion and get License.
Let me explain briefly as follows.
- First create an account in Syncfusion.
- Then get a Registration License for Xamarin.Forms apps.
- Finally, add this license to the App() constructor method of App.xaml.cs class as follows.
public App()
{
    Syncfusion.Licensing.SyncfusionLicenseProvider.RegisterLicense("YOUR REGISTER LICENCE");
    InitializeComponent();
    MainPage = new ContentPage();
}
2) Launch the SfListView on Each Platform
To use the SfListView plugin in Xamarin, you must launch it on a platform specific. So, after installing the plugin, you cannot use it directly.
Android
Android platform does not require any additional configuration to render the progress bar.
iOS
To launch the SfListView plugin on the iOS platform, go to the AppDelegate.cs class. Then call the Init() method inside the FinishedLaunching() method. As follows. Thus, every time the AppDelegate class launch, the SfListView plugin will also initialize.
using Syncfusion.XForms.iOS.EffectsView;
public override bool FinishedLaunching(UIApplication app, NSDictionary options)
{
    …
    global::Xamarin.Forms.Forms.Init ();
    SfListViewRenderer.Init();
    SfEffectsViewRenderer.Init();  //Initialize only when effects view is added to Listview.
    LoadApplication (new App ());
    …
}
3) Implement MVVM Model
After installing and launching the SfListView plugin, let’s start implementing the MVVM model. Our motivation for this project is to sort and group people in a phonebook list alphabetically in ListView. Follow the steps below in order to reach the result.
Model Class
When implementing the MVVM architecture, we first need to create a model class that is the template for the data. Add a folder named Models to the project and create a class named Contact.cs within that folder.
    public class Contact
    {
        public string Name { get; set; }
        public string Surname { get; set; }
        public string Phone { get; set; }
        public string Image { get; set; }
    }
Model class like this. Name, surname, phone and image variables are kept for each Contact.
ViewModel Classes
In the MVVM architecture, the ViewModel class is created to bind the View and Model classes. For this, add a folder named ViewModels to the project.
BaseViewModel
We need a base ViewModel class to control data changes. The BaseViewModel class is required to report changes to the Model class to the View. Create a class named BaseViewModel.cs inside the ViewModels folder. This will inherit from the INotifyPropertyChanged interface.
public class BaseViewModel : INotifyPropertyChanged
{
    public event PropertyChangedEventHandler PropertyChanged;
    public void OnPropertyChanged([CallerMemberName] string name = "")
    {
        PropertyChanged?.Invoke(this, new PropertyChangedEventArgs(name));
    }
}
ContactViewModel
Add a class named ContactViewModel.cs to the ViewModels folder. This class will be the class to handle the data and will inherit the BaseViewModel.cs class.
public class ContactViewModel : BaseViewModel
{
    public ContactViewModel()
    {
        ContactList = GetContact();
    }

    private ObservableCollection<Contact> GetContact()
    {
        return new ObservableCollection<Contact>
            {
                new Contact {Name="Serkan", Surname="Şeker", Phone="000-000",Image="http://www.pngall.com/wp-content/uploads/5/Profile-PNG-File.png"},
                new Contact {Name="Smith", Surname="Adams", Phone="000-000",Image="http://www.pngall.com/wp-content/uploads/5/Profile-PNG-File.png"},
                new Contact {Name="Johnson", Surname="Mitchell", Phone="000-000", Image="http://www.pngall.com/wp-content/uploads/5/Profile-PNG-File.png"},
                new Contact {Name="Williams", Surname="Turner", Phone="000-000", Image="http://www.pngall.com/wp-content/uploads/5/Profile-PNG-File.png"},
                new Contact {Name="Brown", Surname="Reyes", Phone="000-000", Image="http://www.pngall.com/wp-content/uploads/5/Profile-PNG-File.png"},
                new Contact {Name="Wilson", Surname="Reed", Phone="000-000", Image="http://www.pngall.com/wp-content/uploads/5/Profile-PNG-File.png"},
                new Contact {Name="Anderson", Surname="Watson", Phone="000-000", Image="http://www.pngall.com/wp-content/uploads/5/Profile-PNG-File.png"},
                new Contact {Name="Clark", Surname="Şeker", Phone="000-000", Image="http://www.pngall.com/wp-content/uploads/5/Profile-PNG-File.png"},
                new Contact {Name="Ramirez", Surname="Mitchell", Phone="000-000", Image="http://www.pngall.com/wp-content/uploads/5/Profile-PNG-File.png"},
                new Contact {Name="Lewis", Surname="Ruiz", Phone="000-000", Image="http://www.pngall.com/wp-content/uploads/5/Profile-PNG-File.png"},
                new Contact {Name="Allen", Surname="Reyes", Phone="000-000",Image="http://www.pngall.com/wp-content/uploads/5/Profile-PNG-File.png"},
                new Contact {Name="Wright", Surname="Ruiz", Phone="000-000", Image="http://www.pngall.com/wp-content/uploads/5/Profile-PNG-File.png"},
                new Contact {Name="Torres", Surname="Watson", Phone="000-000", Image="http://www.pngall.com/wp-content/uploads/5/Profile-PNG-File.png"},
                new Contact {Name="Hill", Surname="Reed", Phone="000-000", Image="http://www.pngall.com/wp-content/uploads/5/Profile-PNG-File.png"},
                new Contact {Name="Adams", Surname="Turner", Phone="000-000", Image="http://www.pngall.com/wp-content/uploads/5/Profile-PNG-File.png"},

            };
    }

    private ObservableCollection<Contact> contactList;
    public ObservableCollection<Contact> ContactList
    {
        get { return contactList; }
        set
        {
            contactList = value;
            OnPropertyChanged();
        }
    }
}
Here, let’s create an ObservableCollection and manually enter the data to use when connecting the data to the ListView. There will be no database operation in this project.
Helpers Class
Data does not come grouped directly in the ListView. We can do the grouping process with the method we wrote using the features of the SfListView plugin.
To keep such behavior classes together, add a folder named Helpers to the project and create a class named Behaviors.cs within that folder.
public class SfListViewGroupingBehavior : Behavior<Syncfusion.ListView.XForms.SfListView>
{

    #region Fields

    private Syncfusion.ListView.XForms.SfListView ListView;

    #endregion

    #region Overrides
    protected override void OnAttachedTo(Syncfusion.ListView.XForms.SfListView bindable)
    {
        ListView = bindable;
        ListView.DataSource.GroupDescriptors.Add(new GroupDescriptor()
        {
            PropertyName = "Name",
            KeySelector = (object obj1) =>
            {
                var item = (obj1 as Contact);
                return item.Name[0].ToString();
            },
        });
        base.OnAttachedTo(bindable);
    }

    protected override void OnDetachingFrom(Syncfusion.ListView.XForms.SfListView bindable)
    {
        ListView = null;
        base.OnDetachingFrom(bindable);
    }
    #endregion

}
Notice that this class inherited the SfListView extension’s generic class named Behavior, and we override some methods of that class.
Views Page
We have reached the top rung of MVVM architecture. Add a folder named Views to the project and create a ContentPage named ContactPage.xaml within that folder. This page is the page where the designs will be seen by the end user.
NOTE: Don’t forget to add the SfListView namespace to ContentPage.
xmlns:syncfusion="clr-namespace:Syncfusion.ListView.XForms;assembly=Syncfusion.SfListView.XForms" <ContentPage.BindingContext>
<local:ContactViewModel/>
</ContentPage.BindingContext>
<ContentPage.Content>
<syncfusion:SfListView x:Name="listView" ItemsSource="{Binding ContactList}"
ItemSize="100"
FocusBorderThickness="0"
IsStickyGroupHeader="True"
AllowGroupExpandCollapse="True"
SelectionBackgroundColor="#d6e0f0"
GroupHeaderSize="{OnPlatform Default=40, macOS=70}" >
<syncfusion:SfListView.DataSource>
<data:DataSource>
<data:DataSource.SortDescriptors>
<data:SortDescriptor PropertyName="Name" Direction="Ascending"/>
</data:DataSource.SortDescriptors>
</data:DataSource>
</syncfusion:SfListView.DataSource>
<syncfusion:SfListView.GroupHeaderTemplate>
<DataTemplate>
<ViewCell>
<ViewCell.View>
<StackLayout Orientation="Horizontal" BackgroundColor="#E4E4E4">
<Label Text="{Binding Key}"
FontSize="22"
FontAttributes="Bold"
VerticalOptions="Center"
HorizontalOptions="Start"
Margin="20,0,0,0" />
</StackLayout>
</ViewCell.View>
</ViewCell>
</DataTemplate>
</syncfusion:SfListView.GroupHeaderTemplate>
<syncfusion:SfListView.Behaviors>
<local1:SfListViewGroupingBehavior/>
</syncfusion:SfListView.Behaviors>
<syncfusion:SfListView.ItemTemplate>
<DataTemplate>
<Grid Padding="10">
<Grid.RowDefinitions>
<RowDefinition Height="0.4*" />
<RowDefinition Height="0.6*" />
</Grid.RowDefinitions>
<Grid.ColumnDefinitions>
<ColumnDefinition Width="Auto"/>
<ColumnDefinition Width="Auto"/>
</Grid.ColumnDefinitions>
<Image Grid.Row="0" Grid.Column="0" Grid.RowSpan="2" Source="{Binding Image}"/>
<Label Grid.Row="0" Grid.Column="1" Text="{Binding Name}" FontAttributes="Bold" TextColor="Black" FontSize="21" />
<Label Grid.Row="1" Grid.Column="1" Text="{Binding Phone}" TextColor="Black" FontSize="15"/>
</Grid>
</DataTemplate>
</syncfusion:SfListView.ItemTemplate>
</syncfusion:SfListView>
</ContentPage.Content>And finally, change the MainPage property to the View class in the App.xaml.cs class.
public App()
{
    InitializeComponent();
    MainPage = new ContactPage();
}
Conclusion
Our application is ready. We have done the sorting and grouping operations. The contacts will appear as sorted and grouped in the ListView.
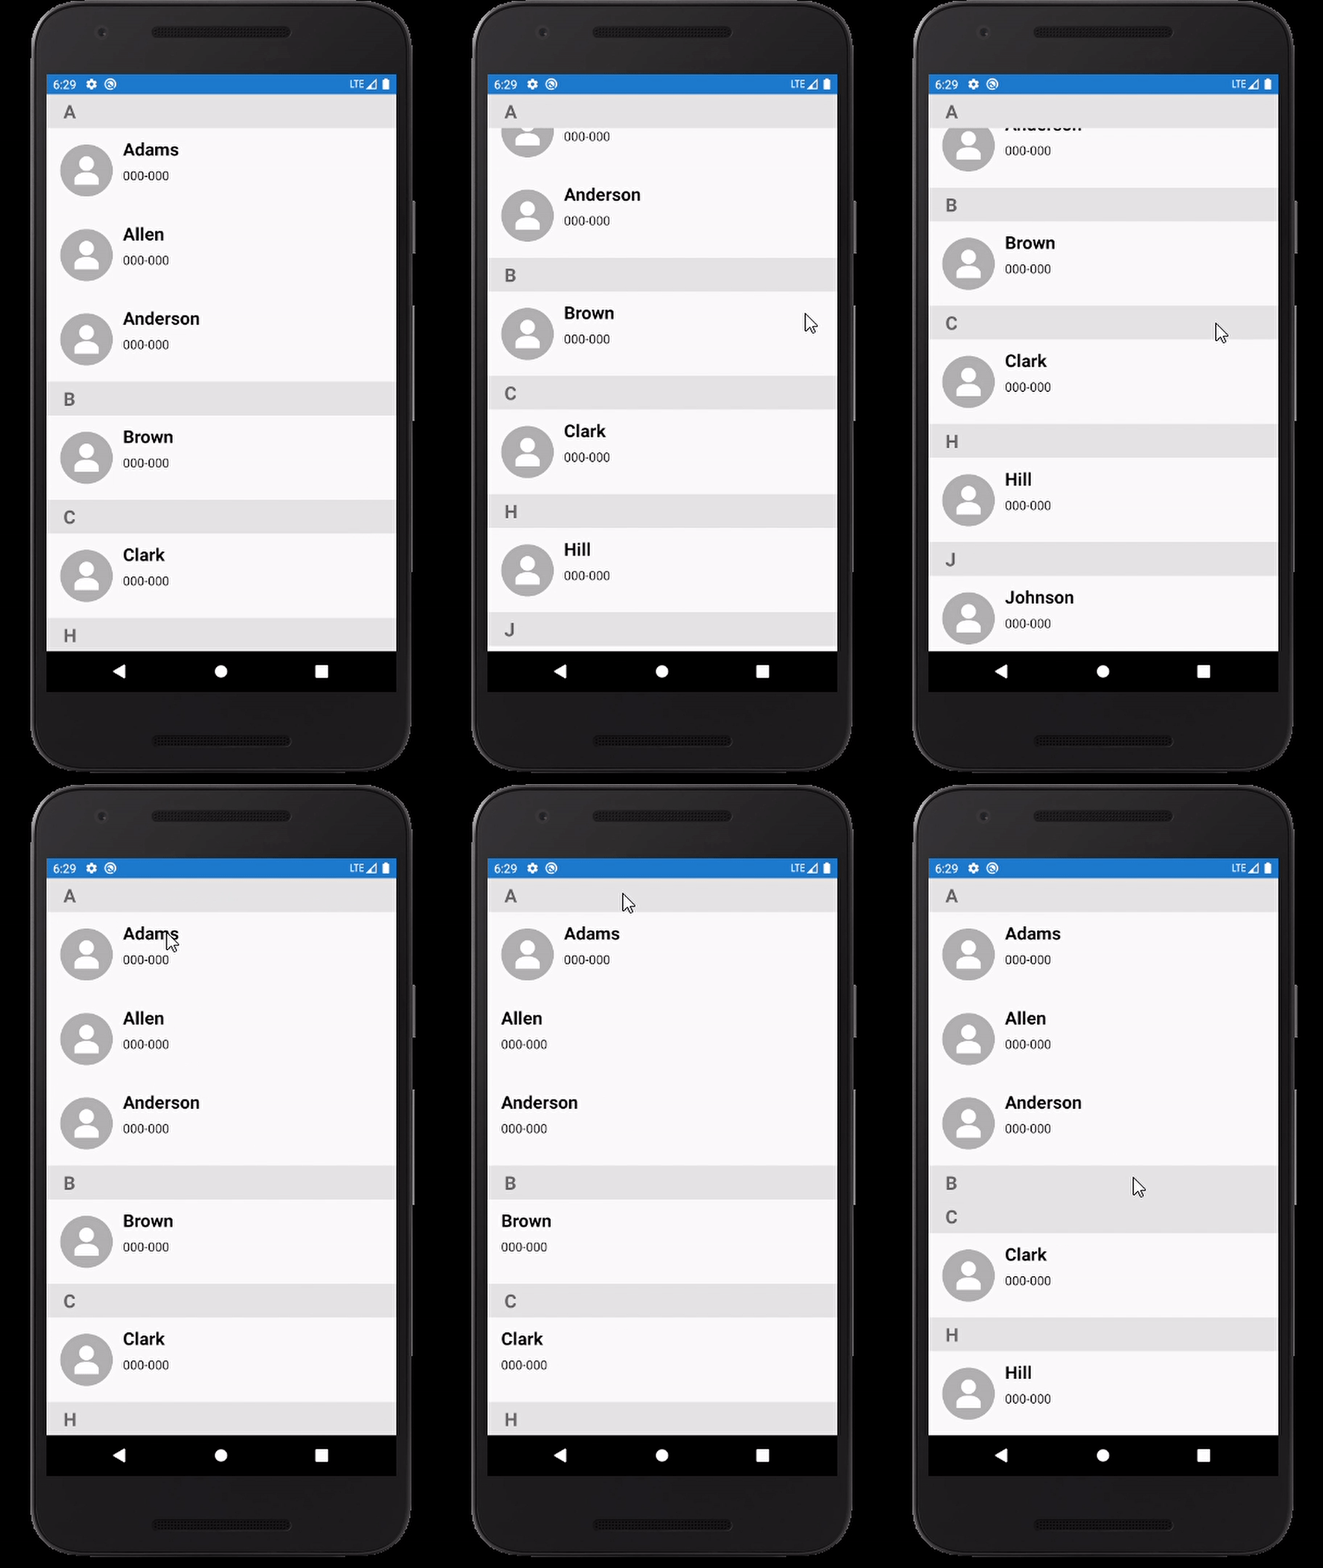
In this post, I explained how to how to group the data in ListView using the SfListView plugin in a Xamarin.Forms project. I hope it was useful.
If you’re still not sure what to do, or if you got any errors, then I suggest you use the comment section below and let me know! I am here to help!
Also, share this blog post on social media and help more people learn.


